Exporting Images and Videos from Your Camera
Standard Exporting
- On the “View” page, select desired camera from the drop-down list
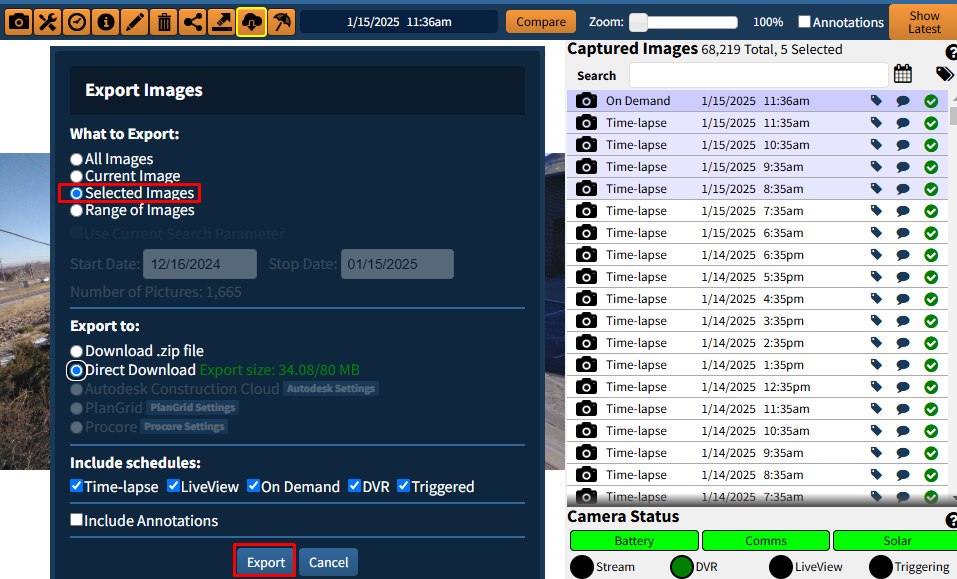
- On the left-hand navigation, select the “Export” button and an additional menu will display (Picture A)
- Select the desired options and click “Export“

(Picture A)

Export Option Definitions:
- Export to:
- Download .zip file: Uploads a .zip file to your SiteCloud account that can be accessed within the Available Downloads screen within the ‘View Camera’ page
- Direct Download: Initiates a direct download of the selected images(s) to your device (Any selection of images that is > 80Mbs will necessitate download via .zip file)
- Autodesk Construction Cloud: Pushes most current Time-Lapse Video or selected image into a BIM 360 project
- PlanGrid: Pushes most current Time-Lapse Video or selected image into a PlanGrid project
- Procore: Pushes most current Time-Lapse Video or selected image into a Procore project
- ——————————————————-
- What to Export:
- All Images: Exports all available images and video clips
- Current Image: Exports only the image currently being viewed
- Selected Images: Exports only the images you have selected in the “Captured Images” pane
- Range of Images: Exports multiple images within the selected Start and Stop Date
- ——————————————————-
- Include Schedules: Further filter an export by image type (Time-Lapse, LiveView, On Demand, DVR, and/or Triggered)
- Include Annotations: Allows a user to include any markups images may have
- ——————————————————-
Please Note:
File Types: Photos are .jpg and Videos are .mp4
Max file size: Downloads will be partitioned in to .zip files no greater than 900Mbs
Auto-delete: All .zip and .mp4 files in the Available Downloads page are automatically deleted after 7 days.
Permission-based User accounts can export so long as the “Change Camera Configuration” permission is enabled
Exporting via Image Name, Tag, or Caption as .zip file
Users that name, tag, or caption their images should follow the steps below if they want to export those images with the selected criteria.
- Type the “Name“, “Tag“, or “Caption” Under the “Captured Images” search bar and hit “Enter“
- Select the “Export” button from the left-hand navigation and choose the following options:
- “Range of Images“
- “Use Current Search Parameter“
- “Export to: Download .zip file“
- Confirm the “Start/Stop Date” you want is correct
- Select “Export“
Additional Notes:
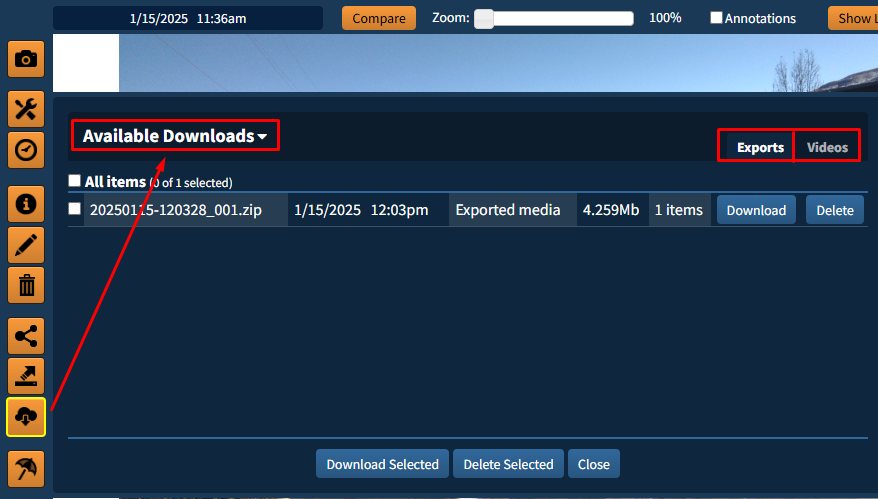
- Completed exports will appear under the “Download” icon with a yellow square surrounding it
- Including annotations or particular “Image Types” can also be selected, if desired.

Exporting Multiple Selected Images as Direct Download
Users can export images via multi-select from the “Captured Images” pane with the use of shortcut keys.
- To select a series of individual pictures on the Captured Images” pane, hold CTRL (Windows) or Command (Mac) on your keyboard. Using your cursor, highlight the images you want
- To select a range of pictures on the “Captured Images” pane, use your cursor to highlight the first picture in the range. Hold “Shift” on your keyboard and pick the last image in the range with your cursor
- Once you’ve made your selections, click the “Export” button and make sure “Direct Download” and “Selected Images” are chosen
- Click “Export”