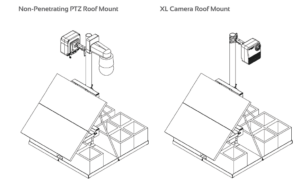
Non-Penetrating Roof Mount Installation Guide
PHASE 1
Parts List

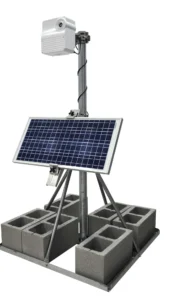
Installation Notes:
- Verify installation location can support the weight of the mount and the concrete blocks used to weigh it down
- Use the provided 1/2’’ wrench for roof mount assembly
- For ease of installation, leave all fasteners slightly loose and tighten once the base angles, brace tubes, and mounting pole are installed and square
- At least 200 lbs of weight must be used to secure roof mount (6 standard concrete blocks depicted not included)
- Add weight evenly to base prior to installing camera/solar panel
- For camera mounting instructions, please refer to the installation guide included with your camera system
Step 1:
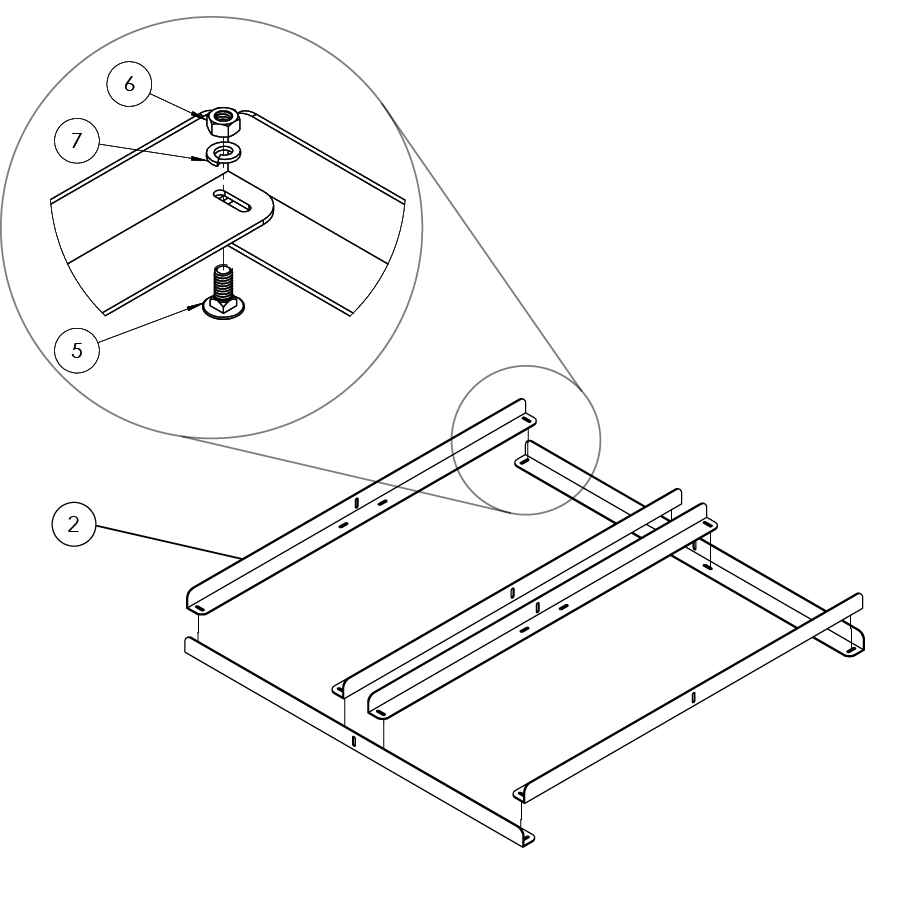
- Remove the 6 Base Angle Brackets (item 2) from the packaging and lay each piece as pictured to the right. Pay careful attention to the angle orientation of each piece.
- Using the 5/16” – 3/4” Carriage Bolt (item 5), with Lock Washer (item 7) and Nut (item 6) assemble the Base Angle Brackets in all 8 locations around the base. This includes each corner and the ends of each of the two middle Base Angle Brackets.
Step 2:
- Remove the 4 Brace Tubes (item 3) from the packaging and loosely secure them to the sides of each of the outside Base Angle Brackets using the remaining 5/16” – 3/4”, Carriage Bolts, Lock Washers and Nuts.

Step 3:
- Secure each of the Brace Tubes to the Mounting Pole (item 1), using the 5/16” – 3 1/2” (item 4), Carriage Bolts with Lock Washer and Nut.

Step 4:
- Secure each of the Brace Tubes to the Mounting Pole (item 1), using the 5/16” – 3 1/2” (item 4), Carriage Bolts with Lock Washer and Nut.

Step 5:
- Carefully place 6 concrete blocks (not included) within the Base Angle Brackets. This weighs the base down, preventing it from tipping easily.

Step 6: (PTZ and XL model users, skip to Phase 2)
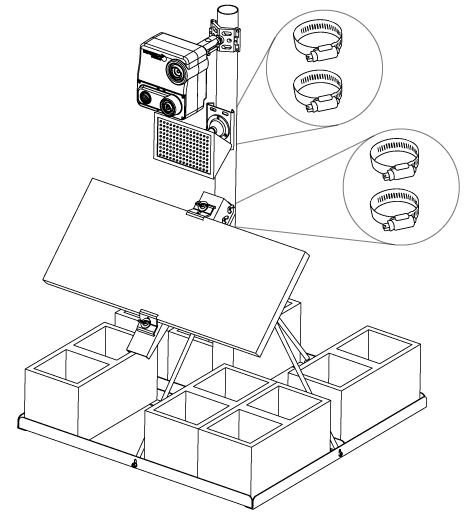
- Mount your Senersa Systems Camera and Solar Panel using the instructions provided with your camera. Use 2 of the 4 provided band clamps for the MC Series Cameras, or use all 4 band clamps if installing the SiteWatch PRO2 camera. Place the Solar Panel as low as possible, and place the camera as high as possible on the mounting pole.
MC Series Cameras
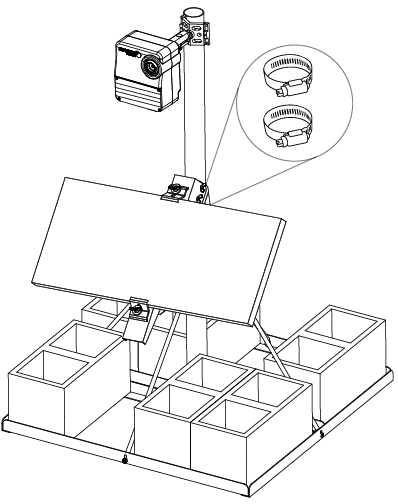
SiteWatch PRO2 Cameras
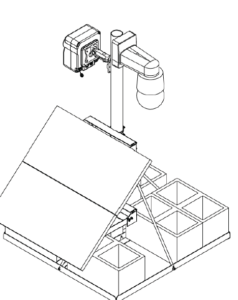
PHASE 2 (for PTZ and XL Models)
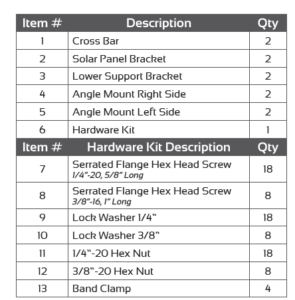
Parts List
Installation Notes:
- Verify installation location can support the weight of the mount and the concrete blocks used to weigh it down
- Use the provided 1/2’’ wrench for roof mount assembly
- For ease of installation, leave all fasteners slightly loose and tighten once the base angles, brace tubes, and mounting pole are installed and square
- At least 200 lbs of weight must be used to secure roof mount (6 standard concrete blocks depicted not included)
- Add weight evenly to base prior to installing camera/solar panel
- For camera mounting instructions, please refer to the installation guide included with your camera system
Step 1:
- Assemble two (qty 2) cross bars
- Ensure the 2 different angle mounts are used (left and right). The angle mounts are mirrors of each other.
- Ensure the chamfered edge on each of the angle mounts is facing upward.
- Leave the bolted connections loose enough such that the
angle mounts can slide. - Secure the angle mounts to the cross bar using 3/8”- 16, 1” long serrated flange bolt with lock washer and nut.
Repeat in 4 locations per assembly (8 locations total)

Step 2:
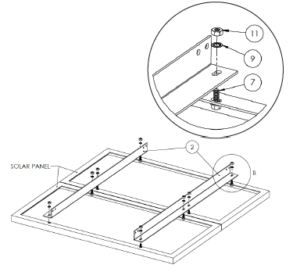
- Ensure the solar panel brackets are oriented correctly with the vertical portion facing inward
- Secure the solar panel to the bracket using 1/4″ – 20,5/8″ long serrated flange bolt with lock washer and nut. Repeat in all 8 locations.
Step 3:
- Ensure the angle mounts are inside each of the solar panel brackets
- Verify that the chamfered edge, the left and right angle mounts, are oriented correctly as show.

- Secure the Solar panel bracket to the angle mounts using 1/4″ -20, 5/8″ long serrated flange bolt with lock washer and nut. Repeat in all 4 locations.
- Leave connections loose enough to allow for cross bar to rotate slightly.
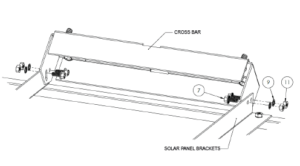
Step 4:
- Feed 2 of the band clamps through the slots in the crossbar
- Tighten band clamps until they are roughly 3″ in diameter and could easily slide over roof mount pole.
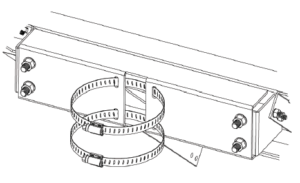
Step 5:
- Thread the two band clamps through the slots in the crossbar
- Mount the lower crossbar about halfway underneath the brace tubes of the roof mount and tighten the clamps to secure the bar.
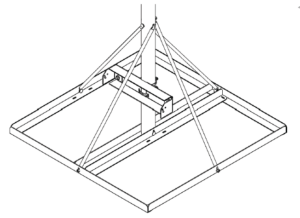
Step 6:
- Install the lower support brackets on the inside of each angle mount of the lower crossbar
- Ensure the horizontal portion of the lower support bracket is oriented inward as shown
- Secure the lower support bracket to the angle mounts using 1/4″-20, 5/8″ long serrated flange bolt with lock washer and nut. Repeat in all 4 locations.
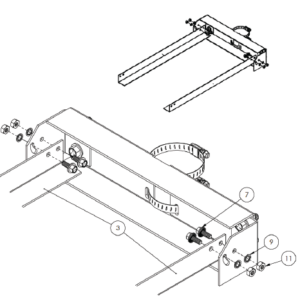
Step 7:
- Slide the solar panel assembly onto the pole through the band clamps
- Allow assembly to slide down to just above the angle braces of the roof mount
- Tighten band clamps enough that the assembly cannot slide easily
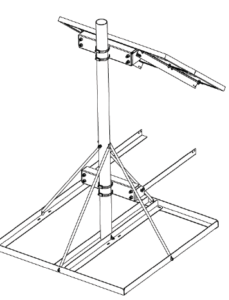
Step 8:
- Ensure the angle mounts are inside each of the solar panel brackets
- Verify that the chamfered edge, the left and right angle mounts, are oriented correctly as shown
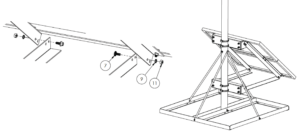
Step 9:
- Tighten all loose connections
- Tighten all band clamps
- Finish installation of cameras
- Carefully place 6 concrete blocks (not included) within Base Angle Brackets. This weighs the base down, preventing it from tipping easily.
Step 10:
- Mount your Sensera Systems Camera using the PTZ or XL Model Installation Guide provided with your system.
